Thursday, December 23

Merry Christmas

For unto us a child is born, unto us a son is given: and the government shall be upon his shoulder: and his name shall be called Wonderful, Counsellor, The mighty God, The everlasting Father, The Prince of Peace. ~Isaiah 9:6


♥Peace and Love from our family to yours♥

Friday, December 17

Thumb print gift tags

I think there is something special about gifts that are actually wrapped, especially when it shows that the person took time to make it beautiful. This year to go on our gifts we made our own gift tags. If you want to make ones like ours you will need:
card stock, ink pads, hole punch, and a pen.
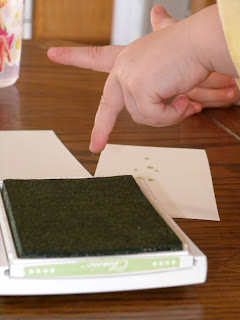
 I cut card stock into the shape of tags but you could also use pre-cut tags. Once I had our tags cut out Scarlett stamped her finger in the ink and we printed them on our tags, it helps to have a wet washcloth handy for this so you can wipe any extra ink off.
 For our reindeer tags we did three fingerprints in a row.
 Once the ink dried I added little eyes, a nose and antlers.
 For the Christmas light tags we alternated our colors and did four fingerprints.
 Once they were dry I added little coils to the tops of the lights....
 And a curly string to hold them all together.
 I then added a To: and From: section to the tags, punched a hole in the end and they were ready to go on our presents.

 Presents ready for Christmas!
This is one excited girl! She is really enjoying all of the holiday fun this year which makes it even more of a blast for us and it's Taylor's 1st Christmas so it's fun to see him checking everything out for the first time. What a blessing to have these little rugrats in our life, I love being a parent!

Monday, December 13

Let's Get Dirty!!

WARNING
You will get messy!!!
We have been experiencing some extremely warm weather for December so we took advantage of it the other day and made a mud pit in the back yard. Scarlett jumped in her bathing suit and crocodile shoes and off we went to make mud.
♥Excited to play in her bathing suit♥

 I would have to say that Scarlett's favorite part of this activity was making the mud, she loves when I let her use the hose and thinks it's especially funny to squirt mommy.
 We brought out all of our sand toys and I found a few sticks in the yard that were just perfect for stirring our mud pies. Scarlett was a little cautious about getting too dirty but had fun all the same. I think next time she'll really get into it.

♥Welcome!♥
After we were done playing in the mud I hosed her off and she happily ran around playing in the yard while she dried off. Pretty crazy that Christmas is in 2 weeks and my kids can play in the yard in bathing suits! 

Thursday, December 2

Circle, Triangle, Square

In an effort to identify shapes a little better we made a game out of it. I took painters tape and recreated shapes on the ground for us to play with.
 We had a blast dancing in them, singing about them, and talking about the different shapes. We took different colored balls and Scarlett placed them in the different shapes and we practiced rolling them into the shapes.
 Then Scarlett got creative and took some of her favorite little stuffed animals and moved them from shape to shape. It got us movin' and groovin', which I love and she can now correctly identify circles, triangles, squares, rectangles, and stars.

Thursday, November 25

Toddler Trail Mix

With toddlers in perpetual motion, it seems that they need an endless amount of fuel to keep them going. I am always on the lookout for good snacks to keep around and threw together this trail mix for Scarlett that has been a real hit. It's pretty much just a mix of toddler friendly finger foods that can be mixed and matched to your kiddos likes. Here's what went into ours:

1 cup dried cranberries
1 cup raw peanuts
1 cup yogurt covered raisins
1 cup organic o shaped cereal

Just pour everything into an air tight container, shake it up and watch it disappear.
Yummy!

Sunday, November 21

Think before you toss

Next time you are going through your kids clothes to pass on things that don't fit anymore, think before you put it in that box. Some items just might not be ready to move on yet. Perhaps some pants that are too short could be shortened into shorts or capris, or cut the feet off some old tights and they become leggings. I recently ran across a dress of Scarlett's that no longer fit her but still had so much life left in it and knew it would be perfect for a refashion.
 I had a shirt sitting in her closet that was still a few sizes too big for her that had been handed down to us and was the same purple as the dress. I cut the bottom of the dress off, gathered it and sewed it to the bottom of the shirt to create a new dress. I then used the leftover fabric to make a bow that I added to the waistband for a little extra sass. Not to let anything go to waste, I cut the bows off the straps of the old dress, glued them to hair clips and voila!, instant matching hair accessories.

What do you have in the closet just waiting to be reborn?

Monday, November 15

From Summer to Winter

Please excuse my short hiatus, I was having some technical difficulties but have worked them out.
So with the weather cooling off now I have found us to be a bit lacking in the warm clothes department. Always trying to stretch our budget, I wanted to work with the great clothes we already had but just make them a little more comfortable to the cooler days. One of the ways I did this was by making Scarlett's short sleeved shirts into long sleeved shirts.  All you need to do is cut the sleeves off a long sleeved shirt that no longer fits and add them to the bottoms of a short sleeved shirt.

 Of course this only works if the sleeves from the old shirt still fit around your little ones arms, so check to make sure before you begin.


 And when you are done you are left with a shirt just perfect for these lovely fall days.

Monday, November 1

Bubble Bowl

As long as your kiddo can blow out through a straw and keep from sucking in, then this is a really fun activity that cost nothing!  All you need are straws, a bowl, water, and a bit of dish soap.
 Take a bowl and add about a teaspoon of dish soap and then fill with water.  We did this on a rainy day, so we just put a towel down on the kitchen floor and played inside but you could also take your bowl outside and not have to worry about any mess.
 Once you are set up, poke your straws down in the water and start blowing, you will end up with all kinds of bubbles that will just keep growing and growing.

 Scarlett had just as much fun playing with the bubbles as she did creating them.
We played with them with our hands and popped them with the straws and kept busy for almost and hour, not bad for using stuff right out of your own kitchen.

Monday, October 25

Creepy Crawly Spiders

 If you hadn't noticed, I was on an egg carton crafting kick recently and couldn't go without making some creepy little spiders. For these little guys all you need is black and white paint, an egg carton, pipe cleaners, string and glue.
First cut your egg carton into sections and make sure the bottoms are left flat. Then paint them black and add little finger print eyes. Once your paint is dry add little black circles to the center of your eyes. Now you will need something sharp to poke 4 holes into the sides of your spiders body so that you can poke your pipe cleaner legs through, I used the tip of some very pointy scissors.
 Depending on how long you want your creepy crawly legs, you can either cut your pipe cleaners in half you use one whole one to thread through the holes that you poked in the sides. Once you have the pipe cleaners through, bend them into little spidery legs.
 Now all you need to do is attach a piece of string to the back of your spider with a little glue (I find that hot glue works best for this), if you want to hang him, and he's all set to scare.

Boo!

Friday, October 22

Egg Carton Bat

Watch out when you enter our house cause you might just get bit by one of these furry little critters.
To make your own bats you will need:
Black and white paint, and egg carton, brown faux fur, hot glue, brown card stock, and string.
 You make the head the same way we did for the kitty, leaving 2 ears in front and painting it black.
Then add your eyes, again the same way we did the kitty, by using your child's fingerprint.
 Then take a black marker and add black to the center of the eyes, it's makes them so much cuter.
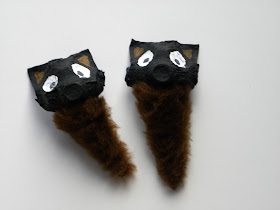
 Cut your faux fur into sections and roll them into ice cream cone shapes, these will become the body. Glue them together and you are ready to assemble your bat.
 Glue your bat head to the body, making sure to leave room below the eyes to add a mouth. I forgot to take pictures of this steep but to make the mouth take your white paint and paint a little smile on the face and add 2 little fangs sticking out.
 Cut wings out of your card stock, then fold them in half, this way they will look like they are flapping. Then glue your wings to the back of your bats body. I then tied a piece of string around the bats neck, hiding it under the fur, and pinned the bats to the ceiling. I think they make a nice little addition to our spooky decor.
“Twinkle, twinkle little bat. How I wonder what you're at! Up above the world you fly, Like a tea-tray in the sky"  ~Lewis Carroll

Wednesday, October 20

Egg Carton Kitty


With Halloween approaching we did some egg carton crafts around here to make a few decorations. The first one I am going to share is the black Halloween cat. We are fans of black cats in this house, as our dear kitty Sid is a black cat.
For this craft you will need an egg carton, black and white paint, pink felt, ribbon in any color and pipe cleaners in the color of your choice.
 Start out by cutting each section of the egg carton into pieces.
 For the head cut the 2 back points off, leaving the 2 front ones for ears. For the body leave all the points, these will become the kitty's legs.
 Paint everything black or any color you want your cat to be.
 Then take your little kiddos finger tip, brush it with white paint and press it onto the kitty head for eyes.
 The faces with fingerprint eyes.
Then take a black marker and add circles to the center of the eyes so they don't look creepy.
Take your pipe cleaners and cut them in fourths, these will become your whiskers.
 Poke holes into the sides of the nose area and stab your cut pipe cleaners though to make whiskers.
 Then take your pink felt and cut it into little triangles, 2 to fit in the ears and one for the nose. Glue them in place.
You can now glue your kitty's head to its body. Then take your ribbon and tie a little bow around it's neck to make a collar. Finish your little guys up by taking a pipe cleaner and curling it into the shape of a tail and gluing it to the back side of your kitty. 
And these are the cute little guys you end up with. Place them around the house as decoration or let your kids play with them as new pets that you don't have to clean a litter box up after.
Enjoy!