Tuesday, May 25

Pine Cone Bird Feeders

When I was younger I loved making pine cone bird feeders. It is such a simple project but has a fun payoff of attracting and feeding little birds that will come and sing to you.

All you need is smooth peanut butter, birdseed, pine cones, twine, a butter knife and a plate.

It is easiest if you start out by tying your twine around the tops of your pine cones so that you have something to hang them from when you are ready to take them outside.
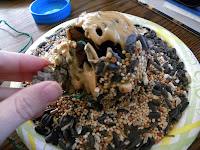
Then you will take your butter knife and coat your pine cone in a layer of peanut butter, trying to get in the nooks and crannies as good as possible.
As soon as it's good and coated, roll your pine cone in your birdseed, pressing it in so it is covered really well. This is a great time for your little helper to lend a hand, sprinkling seed on and pressing it down. Expect those little hands to make a bit of a mess but don't worry, its nothing a quick vacuuming and a wet towel cant clean up.

They are now ready to be hung for the birds.
We tied ours in a bush we have out front and are looking forward to our 1st chirping visitors.
Rating:♥♥♥
Cost:$

Wednesday, May 12

Magnetic Paper Dolls

I loved playing with paper dolls when I was a girl and have been looking forward to the day I could introduce Scarlett to paper dolls. I had some old Mary Engelbreit magazines and she had a different adorable little doll each month that she would share. I had been cutting them out and saving them for when Scarlett would be a little gentler with things. Then an idea came to me that would let us play with them now, magnetic paper dolls for the fridge. They were super easy to make and I have been having just as much fun with them as she is.
All you need are scissors, magnetic sheets (which you can find at craft stores), something to laminate the fronts of your dolls (I used packing tape), and your paper dolls.

First rough cut your dolls and their outfits out. Then you will want to laminate the fronts of them to give them a little bit of extra protection. I just used regular packing tape but you could also use laminating paper if you have some around.

Then place them on the sticky side of the magnetic sheets. Try to place them so that you are getting the most out of your sheet. Then you just cut them out, staying as close as possible to the outline of the doll. The sheets are very easy to cut but it helps to have a pair of small sharp scissors so you can get in and around some of the smaller details. Once they are cut out you are all set!
They work great on the fridge and their little clothes stick on no problem.

The first thing she said when she saw them was "OOOOOH pretty!!" and they make for a great distraction when I am trying to get things done in the kitchen.
Rating:♥♥♥
Cost:$

Friday, May 7

Let's Dance!!


We love to dance around here and are always looking for new music to listen to. We love picking up new stuff to listen to when we are at the library but I was recently introduced to something I love even more. It's called pandora and is a free online radio. It's cool because you can choose the genre that you like and it's commercial free. What made me fall in love with it is their toddler station. They play music from Sesame Street, Disney movies, Boz (one of Scarlett's favorites), and a variety of other stuff. I personally enjoy having some kind of background noise throughout the day like our own personal soundtrack, now I have a great place to turn to for it.

Sunday, May 2

Grand Opening!!


My Etsy store is now officially open! You can buy Sassy Scarlett headbands and hair clips online. Check out the site


You can also use the Etsy icon on the right to access the site. Check back often because I will always be adding new inventory. If you'd rather not pay shipping, feel free to come by the house anytime and shop. Thanks for visiting!

~Amylee

LinkWithin

Related Posts Plugin for WordPress, Blogger...