Thursday, March 31

Pancake Fun

A few days ago we got our 1st Clubhouse Jr. magazine and while Scarlett and I were looking through it we ran across a picture of a pancake spruced up with fruit. It inspired me to create our own for breakfast the next morning. Scarlett had a happy sunshine and Taylor had a crazy cat.
 The kids were giggling and excited and loved picking them apart and munching on the fruit.
 Taylor wanted seconds and thirds.
 It was a breakfast hit!

Tuesday, March 29

Toe Socks into Leg Warmers

I have a friend that had some old toe socks with funky cool patterns and was she was wondering if I could make those into leg warmers also. I rose to the challenge and they turned out really cute. They are a little shorter then knee high socks but are a great length for babies and toddlers little legs and are a great up-cycling project. The ones I made here had no heel so that gave me extra length to work with too. 

I started out by cutting the toe part off and tossed it, leaving as much length to the sock as possible. 
 I then serged all the way around the bottom to keep it from fraying, you could also do a zigzag stitch with your sewing machine.
 Then I turned the ends under about half an inch, pinned it in place and straight stitched it all the way around with a coordinating thread since it would be showing. So that the bottom of your leg warmer has some stretch and give to it, make sure your straight stitch is long, I had my stitch length set at 4. That's it, your done!
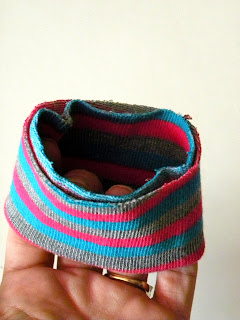
Your finished leg warmers should look similar to these bad boys. Now I just wish I had a picture of my friend's super cute daughter in hers to show you.

Monday, March 28

Knee High Socks into Leg or Arm Warmers

I was recently at Target picking up some stuff and came across their selection of women's knee high socks, I was so excited by what I saw. They have the cutest patterns and colors and I found some on clearance for under $2. What had me so excited about all these socks was what they were to become, leg warmers for Scarlett and arm warmers for me on cold morning runs. Now I am hardly the first person to do this but I thought I would share how I went about making ours.
 If you want to make your own you will need:
Socks
Scissors
Sewing machine or serger
 It took me about 10 minutes to make one pair, so it's a really great nap time project. I ended up making 13 pair that day but don't worry they weren't all for me, several were going to other homes.

The first thing I did was lay my socks out flat.
 Then I cut them into 4 sections, the leg (save as much as possible), the heel, the foot and the toe. You can then toss the heel and toe , you will only need the leg and foot sections for these.
 This is what you should be left with, you want your cuts on the ends to be as straight as possible
 Then fold the foot piece under, wrong sides touching, cut ends together, so that you are left with a tube.
 Then slip that over the bottom of your leg piece, matching up all the cut ends, folded end facing up.
 It should look like this, 3 raw ends all the way around.
 Pin them in place, keeping them lined up as best as you can. Make sure you are leaving an opening, otherwise you wont get your leg/arm in your warmer.
 Then using a serger or zigzag stitch on a sewing machine, sew all the way around the bottom, making sure to catch all three layers. You want to make sure your stitches aren't too close together so that there is some give to it, I used a serger and had my stitch length set at 2.  I was lazy and used white thread on all my socks because it really doesn't show on your finished product, it's up to you if you want to use matching thread.
 Once they are sewed together, flip that piece down and your finished. They might look a little ripply where you joined the two pieces together but don't worry they work themselves out some in the wash and don't show when they are on.
 I'm so excited because arm warmers for running are not cheap and I was able to make myself some fun ones for less than $2 each.
 And they are so great for Scarlett in this in between weather. When it's cold in the morning her legs are nice and toasty and she can still wear a skit and when it warms up later in the day we can just slip them off and she's good to go.
 Not to mention, they are super comfy for any kind of activity.
In my next post I will show you how you can do the same kind of thing with a pair of toe socks. Until then, have fun!!

Friday, March 25

To Auntie With Love

Last weekend was the kids Auntie Rachel's birthday so I had Scarlett sign in the card for her. She usually just does a few lines here and there on the paper but this time she worked really hard to make her a picture. This is the first time she has drawn something other then a circle that was actually suppose to be something. She drew her an apple and a crown and I labeled them for Auntie in case she couldn't tell. I look forward to drawings of people that are circles with arms and legs coming out of their heads and horses that look like dinosaurs. I love the imaginations of children and seeing the things they create, they are brilliant.

Thursday, March 24

One for you, one for me

It was one of my best friends daughter's birthday, so for her party I made her and Scarlett matching skirts. I figured if I was making one it wouldn't take much longer to make two and thought it would be fun to get pictures of the girls together one day in their matching outfits.  
 I had some watermelon fabric that I was excited to do something with and this was just the project for it. I followed the tutorial for the market skirt on Made. It was a really easy tutorial to follow and I'm really happy with the way it turned out. I didn't get around to adding the pockets like she did but would like to add them later.
 I find it so satisfying to see my kids running around in things I made them. Scarlett was so excited watching me make this skirt for her and she couldn't wait to wear it, it made me very happy.
 ♥Flowers for grandma♥
Now I can't wait to see the birthday girl in hers.

Tuesday, March 22

Craft Stick Puzzle

Puzzles are a favorite activity around here right now so the other day we created our own.
All you need to make your own puzzle are:
craft sticks
markers
& tape
 Figure out how long you want your puzzle to be, line your sticks up and tape them together. We made ours 7 sticks long.
 Then flip your sticks over, bust out your markers and get to drawing your picture on.
 With Scarlett being only 2, I like using washable markers and keep a wet paper towel handy to wipe up any messes when they happen.

 Scarlett went with a circle theme on her puzzle and I added her name to the top and bottom so she can practice putting the letters in her name in order.
 Once your picture is done, pull the tape off the back, scramble up the pieces and let them get to work putting them back together.
 While Scarlett made her puzzle, I also made one of the Cheshire Cat from Alice in Wonderland for her to put together, it was very fun to make.

When we were done playing, I bundled them up with rubber bands for another day.
“Nothing is more exciting and bonding in relationships than creating together”

~Stephen R. Covey

Friday, March 18

Upcycled Tink Pillow

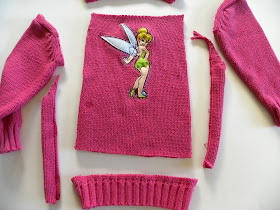
Every few weeks I go through the kids clothes to see if there is anything they have outgrown. If I come across something with a cute print I will set it aside for possible future projects. I recently found this pink Tink sweater hanging in Scarlett's closet that was getting a little too tight for her. The little Tink applique was just too cute to send on it's way so it got a new life.

 Scarlett fell in love with it as soon as I gave it to her, which makes every project worth doing. This sweater was tiny so it made a nice little toddler size pillow, perfect for a toddler bed or for traveling in the car but you could do it with any size sweater.
 The first thing I did was lay it out flat and then cut off the sleeves, and squared off the top, bottom and sides leaving me with 2 rectangular pieces, one that was the front and one that was the back.
 I then put right sides together and sewed all the way around 3 sides and half of the fourth, leaving a gap big enough to turn it inside out and then stuff it.
 I then turned it inside out...
 and stuffed it with polyfill until it was nice and fluffy. While I was still able to fit my hand inside I made sure to stuff the corners really well so that it would hold it's shape a little better.
 Once it was stuffed, I hand sewed the opening closed using a matching thread and it was done!
 This was a really easy nap time project, it only took about 30 minutes, and it's always fun to give the kids something new when they wake up from their naps.

♥Fairy goodness♥

Thursday, March 17

Spring Planting

Now that it looks like frost is behind us we have been out in the yard doing some planting. Taylor LOVES to get wet and play in the mud under the sprinkler, I love his soggy little butt.

 Thanks to my grandma, we got 2 orange trees that we put in out back and we also planted a fuerte avocado.
 Scarlett also helped me plant a few strawberry plants and some basil. We are also growing two grapes, one concord and one thompson seedless, mint, catnip, chives, brussel sprouts, and have a few rows of lettuce hanging on. When we moved in there was a lemon and peach out back and both are doing well. I'm looking forward to those delicious peaches, the juice from them running down your hands while you eat them. We have a few more things planned to go out but that's it for now.
In the mean time the kids can run around, play in the mud and spy on the neighbors through the fence. Scarlett is our own little neighborhood watch, so look out!